Kotlin Android Extensions - findViewById()는 이제 그만!
중요: 2021년 중으로 코틀린 안드로이드 익스텐션 플러그인 지원이 중단될 예정이며, 이 시점 이후부터는 익스텐션을 더이상 사용할 수 없습니다.
아래 글에 소개된 기능을 사용하고 싶으신 분들은 안드로이드 뷰 바인딩 (Android View Binding)을 대신 사용하실 수 있습니다. 자세한 사용법은 이 포스트를 참고하세요.
액티비티, 프래그먼트 등 뷰를 직접 다루는 컴포넌트에서는, XML 형태로 레이아웃을 작성하고 이를 뷰 객체로 불러와 사용하는 경우가 많습니다.
이 때, 레이아웃 내 선언된 각 뷰에 대한 인스턴스를 받기 위해 findViewById()를 많이 사용합니다. findViewById()를 사용하는 방법이 어렵진 않지만, 한 화면을 구성하는 뷰 객체가 많은 경우 뷰 인스턴스를 받아오는 코드만 꽤 많은 부분을 차지하게 됩니다.
액티비티를 예로 들면, onCreate() 부분이 다음 예처럼 뷰 인스턴스를 받아오는 부분으로 도배되는 건 일상이 되어버립니다.
public class MainActivity extends AppCompatActivity

    // 뷰 인스턴스 선언
    private TextView tvTitle;
    private TextView tvSubTitle;
    private ImageView ivProfile;
    private Button btnEdit;
    private TextView tvAddress;
    private TextView tvMemo;

    protected void onCreate(Bundle savedInstanceState) {
        super.onCreate(savedInstanceState)
        setContentView(R.layout.activity_main);

        // 뷰 인스턴스 초기화 수행
        tvTitle = (TextView) findViewById(R.id.tv_title);
        tvSubTitle = (TextView) findViewById(R.id.tv_sub_title);
        ivProfile = (ImageView) findViewById(R.id.iv_profile);
        btnEdit = (Button) findViewById(R.id.btn_edit);
        tvAddress = (TextView) findViewById(R.id.tv_address);
        tvMemo = (TextVIew) findViewById(R.id.tv_memo);
    }
}
또한, 뷰 인스턴스를 받는 과정에서 잘못된 id를 넣을 경우 null이 반환됩니다. 이는 코드 내 뷰 인스턴스와 레이아웃 내에 선언된 뷰 사이에 연관 관계가 없어 이를 개발자가 직접 해주는 구조(findViewById()를 사용하여 레이아웃 내 뷰와 코드 내 인스턴스를 연결) 때문에 발생합니다.
이는 안드로이드가 처음 나왔을 때부터 지금까지 여러 개발자들을 꾸준히 괴롭히고 있는 문제인데, 코틀린 안드로이드 익스텐션(Kotlin Android Extension)을 사용하면 이를 매우 쉽게 해결할 수 있습니다.
빌드 스크립트 설정
코틀린 안드로이드 익스텐션(이하 ‘익스텐션’)을 사용하려면 프로젝트에 기본적으로 코틀린 개발 환경 (코틀린 빌드 플러그인 적용 및 프로젝트 의존성에 코틀린 표준 라이브러리 추가)이 되어 있어야 합니다.
익스텐션을 사용하려면 사용하려는 모듈의 빌드 스크립트에 다음과 같이 플러그인을 적용하면 됩니다.
apply plugin: 'com.android.application'
apply plugin: 'kotlin-android'
apply plugin: 'kotlin-android-extensions' // 익스텐션 플러그인 적용

android {
    ...
}

dependencies {
    ...
}
익스텐션 사용하기 - 액티비티(Activity)
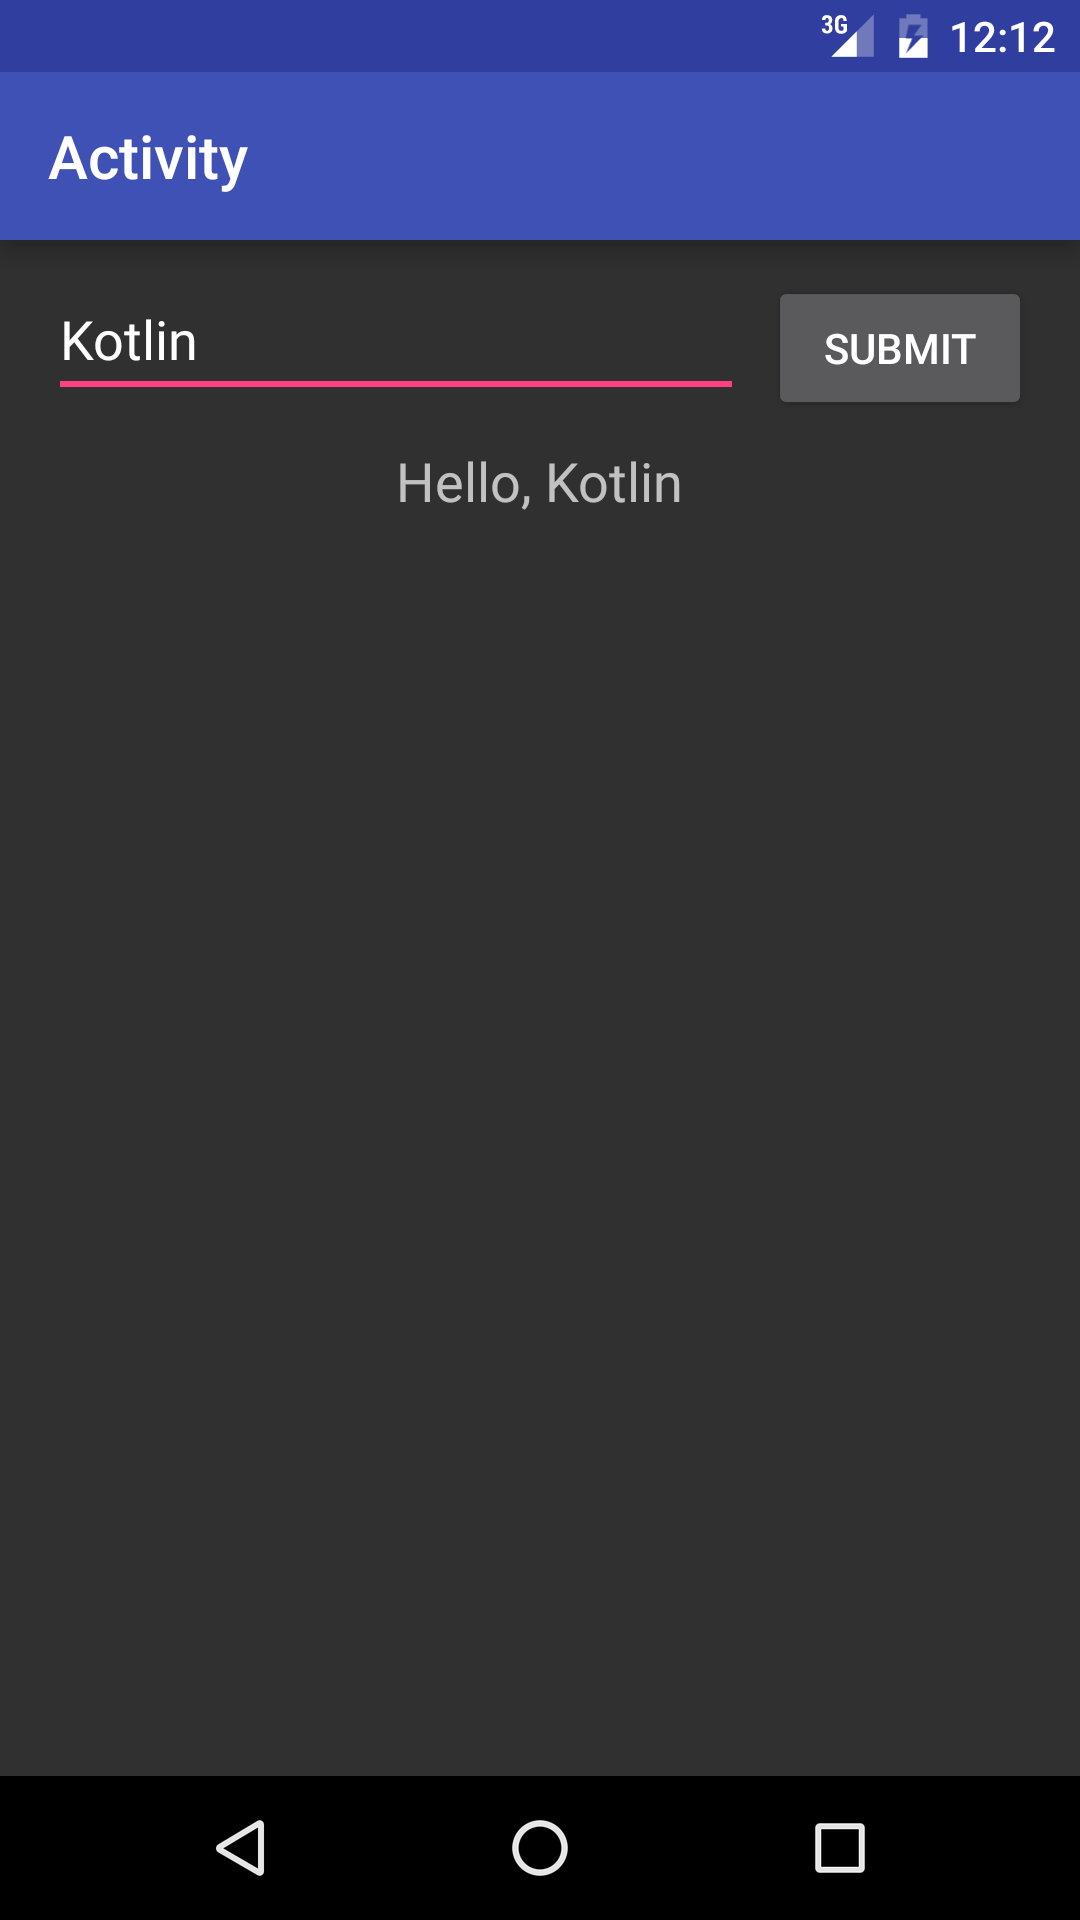
익스텐션을 사용하여 다음과 같이 이름을 입력받아 메시지를 출력하는 예제를 작성해 보겠습니다.
먼저, 다음과 같이 XML로 레이아웃을 작성합니다.
[activity_extensions.xml]
<?xml version="1.0" encoding="utf-8"?>
<android.support.constraint.ConstraintLayout
    xmlns:android="http://schemas.android.com/apk/res/android"
    xmlns:app="http://schemas.android.com/apk/res-auto"
    xmlns:tools="http://schemas.android.com/tools"
    android:id="@+id/constraintLayout"
    android:layout_width="match_parent"
    android:layout_height="match_parent">

    <EditText
        android:id="@+id/et_activity_extension_name"
        android:layout_width="0dp"
        android:layout_height="40dp"
        android:layout_marginEnd="8dp"
        android:layout_marginLeft="16dp"
        android:layout_marginRight="8dp"
        android:layout_marginStart="16dp"
        android:layout_marginTop="16dp"
        android:ems="10"
        android:hint="@string/enter_name"
        android:inputType="none"
        app:layout_constraintLeft_toLeftOf="@+id/constraintLayout"
        app:layout_constraintRight_toLeftOf="@+id/btn_activity_extension"
        app:layout_constraintTop_toTopOf="@+id/constraintLayout" />

    <Button
        android:id="@+id/btn_activity_extension"
        android:layout_width="wrap_content"
        android:layout_height="wrap_content"
        android:layout_marginEnd="16dp"
        android:layout_marginRight="16dp"
        android:text="@string/submit"
        app:layout_constraintBottom_toBottomOf="@+id/et_activity_extension_name"
        app:layout_constraintRight_toRightOf="@+id/constraintLayout"
        app:layout_constraintTop_toTopOf="@+id/et_activity_extension_name" />

    <TextView
        android:id="@+id/tv_activity_extension_hello"
        android:layout_width="wrap_content"
        android:layout_height="wrap_content"
        android:layout_marginEnd="16dp"
        android:layout_marginLeft="16dp"
        android:layout_marginRight="16dp"
        android:layout_marginStart="16dp"
        android:layout_marginTop="8dp"
        android:textAppearance="@style/TextAppearance.AppCompat.Medium"
        app:layout_constraintLeft_toLeftOf="@+id/constraintLayout"
        app:layout_constraintRight_toRightOf="@+id/constraintLayout"
        app:layout_constraintTop_toBottomOf="@+id/btn_activity_extension"
        tools:text="Hello, Foo" />
</android.support.constraint.ConstraintLayout>
다음, 이 레이아웃을 사용하는 액티비티를 작성합니다. 기존 방식이라면 setContentView() 이후 findViewById()를 사용하여 각 뷰 인스턴스를 받는 코드를 추가해야 했지만, 익스텐션을 사용하면 다음과 같이 간결하게 작성할 수 있습니다.
[ExtensionActivity.kt]
import android.os.Bundle
import android.support.v7.app.AppCompatActivity
import kotlinx.android.synthetic.main.activity_extension.*

class ExtensionActivity: AppCompatActivity() {

    override fun onCreate(savedInstanceState: Bundle?) {
        super.onCreate(savedInstanceState)
        setContentView(R.layout.activity_extension)

        // 버튼 클릭 리스너 설정
        btn_activity_extension.setOnClickListener {

            // 텍스트뷰에 사용자가 입력한 텍스트를 조합한 문자열 표시
            tv_activity_extension_hello.text =
                    "Hello, ${et_activity_extension_name.text.toString()}"
        }

    }
}
뷰 인스턴스를 별도 선언 없이 뷰의 id로 바로 접근하는 것을 확인할 수 있습니다.
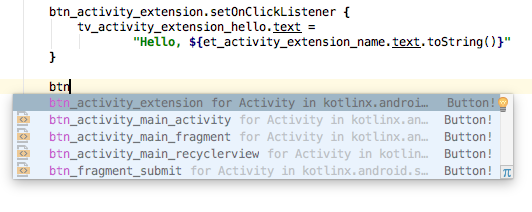
또한, 뷰의 id를 참조하기 위해 import 선언에 import kotlinx.android.synthetic.main.activity_extension.* 이 추가된 것을 확인할 수 있습니다. 추가되는 Import 선언은 다음과 같이 구성됩니다.
import kotlinx.android.synthetic.{sourceSetName}.{layoutName}.*
여기에서 sourceSetName은 애플리케이션의 소스 셋 이름(예: main, free, paid 등; multi-variant 프로젝트에서 사용)이며 layoutName은 이름 그대로 뷰를 포함하는 레이아웃 이름입니다.
Import 선언은 사용자가 직접 추가할 필요가 없습니다. 다음과 같이 뷰 id를 입력하기 시작하면 자동 완성 목록이 표시되며, 목록에서 뷰를 선택할 경우 import 선언도 자동으로 추가됩니다.
익스텐션 사용하기 - 프래그먼트(Fragment)
액티비티에서 익스텐션을 사용하는 방법과 대부분 유사하나, 프래그먼트를 구성하는 레이아웃을 사용할 수 있는 시점인 onViewCreated() 부터 익스텐션을 통해 뷰 객체에 접근할 수 있습니다.
액티비티에셔 사용한 레이아웃과 동일한 레이아웃을 사용하는 프래그먼트 코드는 다음과 같습니다.
[ExtensionFragment.kt]
import android.os.Bundle
import android.support.v4.app.Fragment
import android.view.LayoutInflater
import android.view.View
import android.view.ViewGroup
import kotlinx.android.synthetic.main.fragment_extension.*

class ExtensionFragment : Fragment() {

    override fun onCreateView(inflater: LayoutInflater, container: ViewGroup?,
            savedInstanceState: Bundle?): View {
        return inflater.inflate(R.layout.fragment_extension, container, false)
    }

    override fun onViewCreated(view: View, savedInstanceState: Bundle?) {
        btn_fragment_submit.setOnClickListener {
            tv_fragment_hello.text = "Hello, ${et_fragment_extension.text.toString()}"
        }
    }
}
익스텐션 사용하기 - 리사이클러뷰(RecyclerView)
리사이클러뷰는 각 항목을 표시하기 위해 뷰홀더(ViewHolder)를 사용하는데, 이를 구성하는 레이아웃 또한 대부분 XML 레이아웃으로 작성합니다.
이 글에서는 다음과 같이 이미지가 포함된 항목과 텍스트로만 구성된 항목으로 구성된 리사이클러뷰를 예로 들어봅니다.
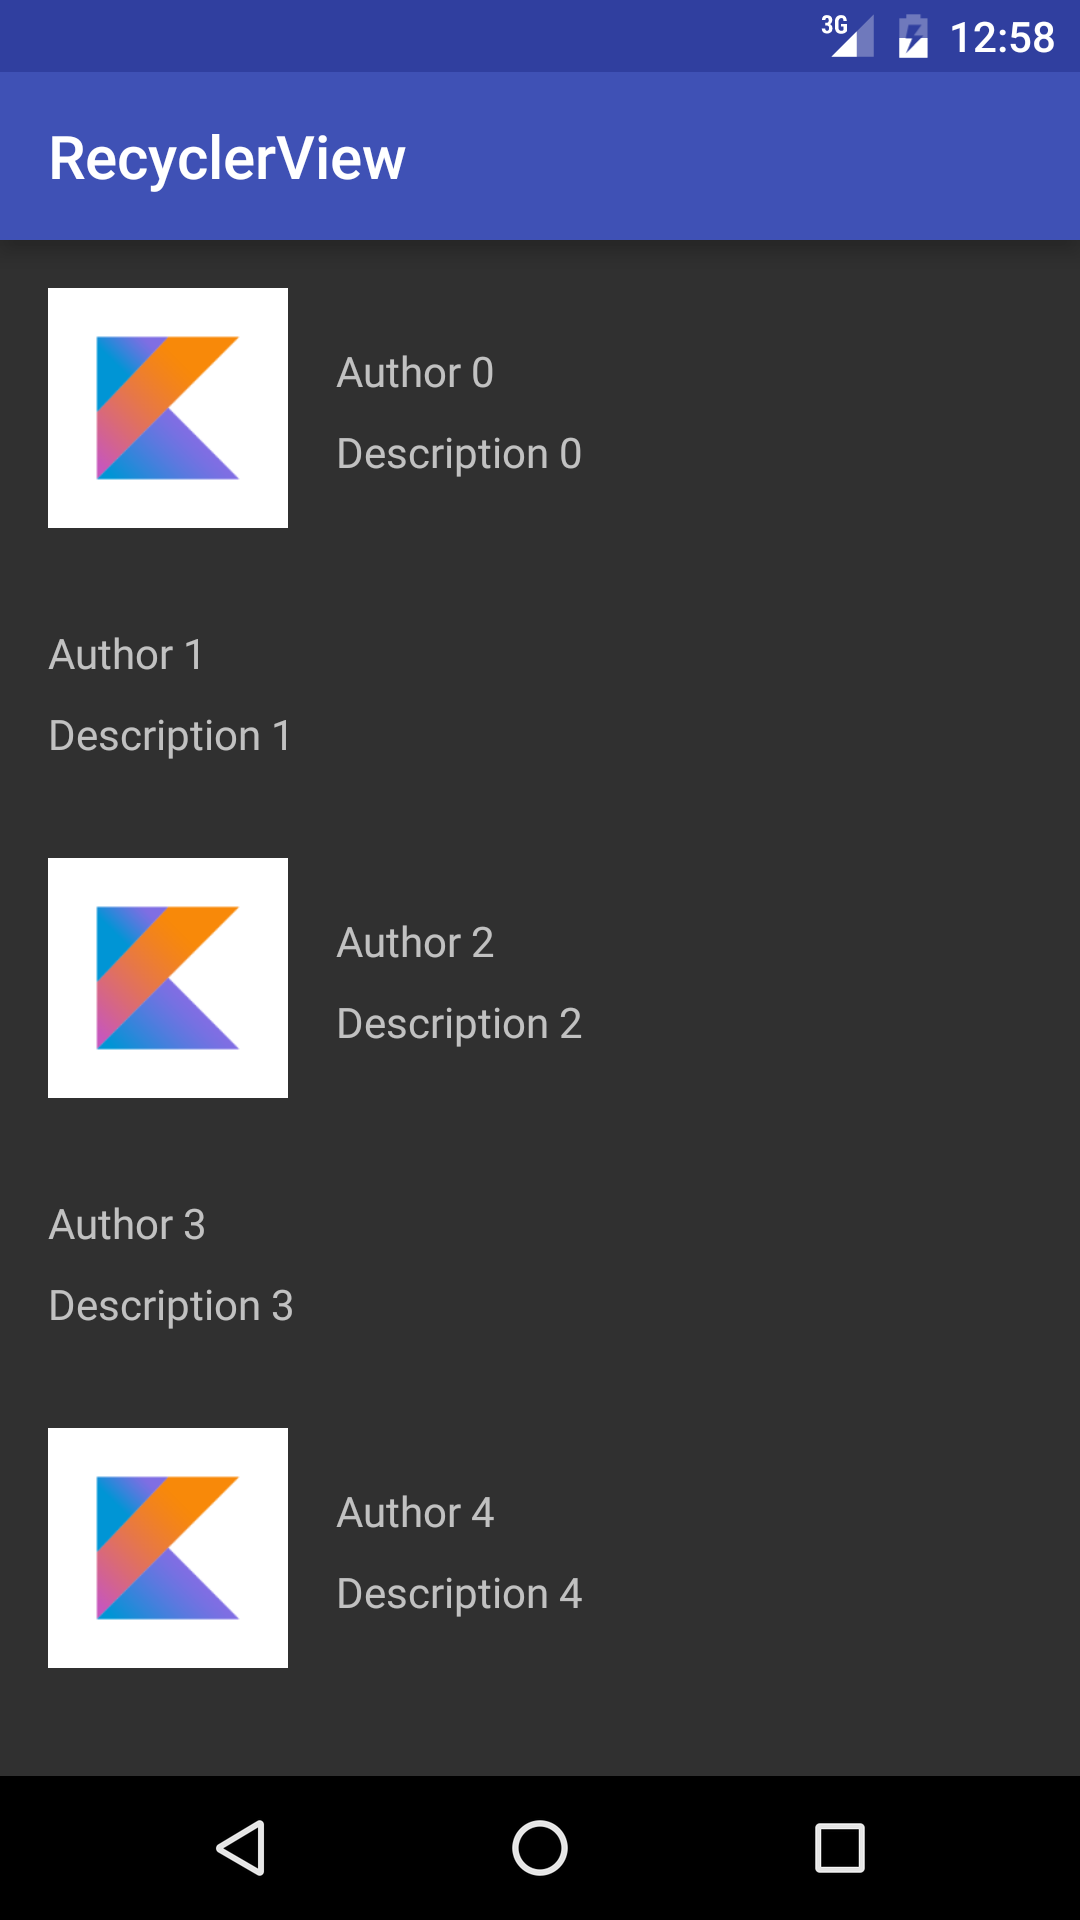
먼저, 각 항목의 레이아웃을 작성합니다.
[item_photo.xml]
<?xml version="1.0" encoding="utf-8"?>
<android.support.constraint.ConstraintLayout
    xmlns:android="http://schemas.android.com/apk/res/android"
    xmlns:app="http://schemas.android.com/apk/res-auto"
    xmlns:tools="http://schemas.android.com/tools"
    android:layout_width="match_parent"
    android:layout_height="wrap_content"
    android:id="@+id/cl_item_photo">

    <ImageView
        android:layout_width="80dp"
        android:layout_height="80dp"
        android:id="@+id/iv_item_photo"
        app:layout_constraintLeft_toLeftOf="@+id/cl_item_photo"
        android:layout_marginLeft="16dp"
        android:layout_marginStart="16dp"
        app:layout_constraintTop_toTopOf="@+id/cl_item_photo"
        android:layout_marginTop="16dp"
        app:layout_constraintBottom_toBottomOf="@+id/cl_item_photo"
        android:layout_marginBottom="16dp" />

    <TextView
        android:layout_width="wrap_content"
        android:layout_height="wrap_content"
        android:id="@+id/tv_item_photo_author"
        tools:text="Author"
        app:layout_constraintLeft_toRightOf="@+id/iv_item_photo"
        android:layout_marginLeft="16dp"
        android:layout_marginStart="16dp"
        app:layout_constraintTop_toTopOf="@+id/iv_item_photo"
        app:layout_constraintBottom_toBottomOf="@+id/iv_item_photo"
        app:layout_constraintVertical_bias="0.3" />

    <TextView
        android:layout_width="0dp"
        android:layout_height="wrap_content"
        android:id="@+id/tv_item_photo_description"
        tools:text="Description"
        app:layout_constraintLeft_toLeftOf="@+id/tv_item_photo_author"
        app:layout_constraintTop_toBottomOf="@+id/tv_item_photo_author"
        android:layout_marginTop="8dp" />
</android.support.constraint.ConstraintLayout>
[item_text.xml]
<?xml version="1.0" encoding="utf-8"?>
<android.support.constraint.ConstraintLayout
    xmlns:android="http://schemas.android.com/apk/res/android"
    xmlns:app="http://schemas.android.com/apk/res-auto"
    xmlns:tools="http://schemas.android.com/tools"
    android:layout_width="match_parent"
    android:layout_height="wrap_content"
    android:id="@+id/cl_item_text">

    <TextView
        android:layout_width="wrap_content"
        android:layout_height="wrap_content"
        android:id="@+id/tv_item_text_author"
        tools:text="Author"
        app:layout_constraintLeft_toLeftOf="@+id/cl_item_text"
        android:layout_marginLeft="16dp"
        android:layout_marginStart="16dp"
        app:layout_constraintTop_toTopOf="@+id/cl_item_text"
        android:layout_marginTop="16dp" />

    <TextView
        android:layout_width="0dp"
        android:layout_height="wrap_content"
        android:id="@+id/tv_item_text_description"
        tools:text="Description"
        app:layout_constraintLeft_toLeftOf="@+id/tv_item_text_author"
        app:layout_constraintTop_toBottomOf="@+id/tv_item_text_author"
        android:layout_marginTop="8dp"
        app:layout_constraintRight_toRightOf="@+id/cl_item_text"
        android:layout_marginRight="16dp"
        android:layout_marginEnd="16dp"
        app:layout_constraintBottom_toBottomOf="@+id/cl_item_text"
        android:layout_marginBottom="16dp" />
</android.support.constraint.ConstraintLayout>
다음, 각 항목의 뷰홀더 클래스를 작성합니다. 뷰홀더에선 itemView.{뷰 id}를 사용하여 각 뷰의 인스턴스에 접근합니다.
[ExtensionRecyclerViewActivity.kt]
class ExtensionRecyclerViewActivity : AppCompatActivity() {

    ...

    inner class PhotoHolder(parent: ViewGroup) :
            RecyclerView.ViewHolder(LayoutInflater.from(parent.context)
                    .inflate(R.layout.item_photo, parent, false)) {

        fun bindView(author: String, description: String) {

            // itemView.iv_item_photo, itemVIew.tv_item_photo_author 과 같이 접근 가능
            with(itemView) {
                iv_item_photo.setImageResource(R.drawable.img_kotlin)
                tv_item_photo_author.text = author
                tv_item_photo_description.text = description
            }
        }
    }

    inner class TextHolder(parent: ViewGroup) :
            RecyclerView.ViewHolder(LayoutInflater.from(parent.context)
                    .inflate(R.layout.item_text, parent, false)) {

        fun bindView(author: String, description: String) {

            with(itemView) {
                tv_item_text_author.text = author
                tv_item_text_description.text = description
            }
        }
    }
}
리사이클러뷰 객체는 기존과 동일하게 onCreate() 에서 레이아웃을 설정한 이후부터 리사이클러뷰의 id(rv_activity_extension_recycler_view)를 사용하여 접근할 수 있습니다.
class ExtensionRecyclerViewActivity : AppCompatActivity() {

    override fun onCreate(savedInstanceState: Bundle?) {
        super.onCreate(savedInstanceState)
        setContentView(R.layout.activity_extension_recycler_view)

        with(rv_activity_extension_recycler_view) {
            layoutManager = LinearLayoutManager(this@ExtensionRecyclerViewActivity)
            adapter = FeedAdapter()
        }
    }

    ...

}
안드로이드 익스텐션을 리사이클러뷰의 뷰홀더에서 사용하는 경우 유의해야 할 사항이 있습니다. Kotlin Android Extensions - 리사이클러뷰의 뷰홀더에서 올바르게 사용하는 방법을 함께 읽어주세요.
예제 코드
이 프로젝트에서 사용한 예제 코드는 다음 저장소에서 확인할 수 있습니다.