AdMob API MCP 서버 만들기 - Part 2: AdMob API 호출을 위한 인증 기능 추가하기
지난 1부에서는 MCP 서버의 기본 뼈대를 만들었죠. 이번에는 서버가 진짜 ‘일’을 할 수 있도록, AdMob API와 연결하는 열쇠, 바로 ‘인증’ 기능을 추가해 보겠습니다.
AdMob API처럼 민감한 데이터를 다루는 API는 아무나 접근할 수 없도록 문을 걸어 잠그고 있습니다. 이 문을 열려면 우리 서버가 “나 이런이런 권한을 가진 사용자야”라고 증명할 수 있는 특별한 인증 토큰이 필요합니다.
Github의 Personal Access Token처럼 토큰을 바로 발급해주면 좋겠지만, AdMob API는 보안을 위해 반드시 OAuth 2.0 인증 절차를 거쳐야만 토큰을 내어줍니다.
조금 번거롭게 느껴질 수 있지만, 이 과정을 한 번만 거치면 우리 MCP 서버가 당당하게 AdMob API와 대화할 수 있게 된답니다. 자, 그럼 시작해볼까요?
첫 단추 꿰기: 구글 클라우드 프로젝트 설정
모든 Google Cloud 기반 API를 사용하려면, 우리 프로젝트의 ‘집’ 역할을 할 구글 클라우드 프로젝트가 필요합니다. 이미 프로젝트가 있다면 AdMob API만 활성화해주면 됩니다.
- 구글 클라우드 콘솔에 접속해서 준비된 프로젝트를 선택해주세요.
- 사이드바에서 API 및 서비스 > 라이브러리 메뉴로 이동합니다.
- 검색창에 AdMob API를 힘차게 입력합니다.
- 나타난 AdMob API 카드에서 사용 설정 버튼을 눌러주세요.
출입증 발급받기: OAuth2 사용자 인증 정보 만들기
API를 사용할 준비는 끝났으니, 이제 우리 서버가 사용할 ‘출입증’을 발급받을 차례입니다.
- 구글 클라우드 콘솔에서 API 및 서비스 > 사용자 인증 정보 메뉴로 이동합니다.
- 사용자 인증 정보 만들기 > OAuth 클라이언트 ID 를 선택하세요.
-
애플리케이션 유형은 데스크톱 앱으로, 이름은
AdMob MCP처럼 기억하기 쉬운 이름으로 지어줍니다.혹시 사용자 인증 정보를 처음 만드시는 거라면, 동의 화면을 먼저 구성해야 할 수도 있습니다. 사용자가 로그인할 때 보게 될 애플리케이션 이름이나 지원 이메일 같은 정보를 입력하는 간단한 과정이니, 도움말 센터 문서를 참고해서 빠르게 설정해줍시다.
- 만들기 버튼을 누르면, 클라이언트 ID와 클라이언트 보안 비밀이 담긴 팝업이 뜹니다. 마치 중요한 비밀번호처럼, 이 정보는 한번 창을 닫으면 다시 볼 수 없어요. 그러니 잊지 말고 JSON 다운로드 버튼을 눌러 파일로 저장해주세요.
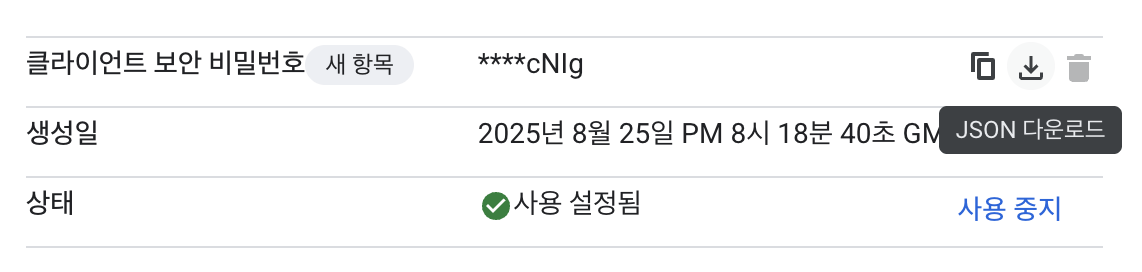
client_secret_xxxxxx.apps.googleusercontent.com.json 같은 긴 이름으로 파일이 저장될 텐데요, 앞으로 코드에서 사용하기 편하도록 파일 이름을 client_secret.json으로 살짝 바꿔주겠습니다.
이제 코드로 마법을 부릴 시간: OAuth 인증 코드 작성하기
방금 다운로드한 client_secret.json 파일을 이용해서 사용자가 직접 구글 계정으로 로그인하고, 우리 서버에 AdMob API 접근 권한을 부여하는 전체 과정을 코드로 구현해 보겠습니다.
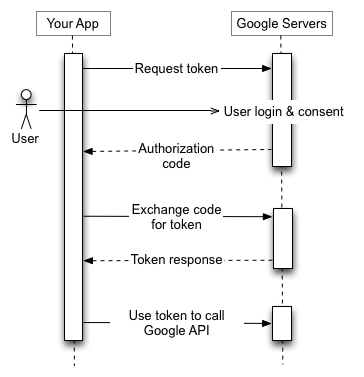
전체적인 인증 흐름은 아래 그림과 같은 시나리오로 진행됩니다.
가장 먼저, 프로젝트 루트에 credentials라는 폴더를 만들고, 그 안에 아까 이름을 바꾼 client_secret.json 파일을 쏙 넣어주세요.
다음으로, 인증 과정에 필요한 두 명의 헬퍼 라이브러리를 설치하겠습니다. open은 사용자 인증을 위해 잠시 웹 브라우저를 열어주는 착한 친구고, google-auth-library는 구글 신분증을 발급하고 관리하는 핵심적인 역할을 합니다.
$ npm install open google-auth-library
$ npm install --save-dev @types/open
이제 src/auth.ts 파일을 새로 만들고, 본격적인 코드 작성을 시작해 봅시다. 먼저 인증 정보를 담아둘 경로를 설정합니다.
// src/auth.ts
import * as fs from "fs";
import * as path from "path";
import * as http from "http";
import * as url from "url";
import open from "open";
import { google } from "googleapis";
import { OAuth2Client } from "google-auth-library";

const CREDENTIALS_DIR = process.env.CREDENTIALS_DIR || path.join(process.cwd(), "credentials");

const CLIENT_SECERT_PATH = path.join(CREDENTIALS_DIR, "client_secret.json");
const TOKEN_PATH = path.join(CREDENTIALS_DIR, "token.json");
그다음, 우리가 AdMob API를 통해 어떤 정보를 ‘읽고’ 싶은지 권한 범위를 명시해줘야 합니다.
const SCOPES = [
  "https://www.googleapis.com/auth/admob.readonly",
  "https://www.googleapis.com/auth/admob.report",
];
각 범위(Scope)가 허용하는 접근 권한은 다음과 같습니다.
| 범위 | 접근 가능한 데이터 |
|---|---|
https://www.googleapis.com/auth/admob.readonly |
계정, 인벤토리, 미디에이션 설정 등 대부분의 AdMob 데이터를 읽을 수 있습니다. (결제 정보 등 민감한 정보 제외) |
https://www.googleapis.com/auth/admob.report |
광고 실적 및 수익 보고서 데이터를 확인할 수 있습니다. |
코드를 작성하기 전에, 우리가 다룰 데이터가 어떻게 생겼는지 ‘타입’을 정의해두면 실수를 줄일 수 있겠죠? client_secret.json과 발급받을 토큰의 구조를 인터페이스로 선언합니다.
interface ClientSecret {
  installed?: {
    client_id: string;
    project_id: string;
    auth_uri: string;
    token_uri: string;
    auth_provider_x509_cert_url: string;
    client_secret: string;
    redirect_uris: string[];
  };
  web?: {
    client_id: string;
    project_id: string;
    auth_uri: string;
    token_uri: string;
    auth_provider_x509_cert_url: string;
    client_secret: string;
    redirect_uris: string[];
    javascript_origins: string[];
  };
}

interface Token {
  type: string;
  client_id: string;
  client_secret: string;
  refresh_token: string;
}
자, 이제 대망의 인증 로직입니다! 전체 코드는 아래와 같고, 핵심적인 흐름은 다음과 같습니다.
- 먼저
credentials폴더에 이미 발급받은 토큰(token.json)이 있는지 확인합니다. - 토큰이 없다면,
client_secret.json파일을 읽어 사용자에게 권한을 요청하는 URL을 생성합니다. - 생성된 URL로 브라우저를 열어 사용자가 로그인하고 권한을 승인하도록 합니다.
- 사용자가 승인하면, 우리 코드는 리다이렉션을 통해 인증 코드를 전달받고, 이 코드를 최종 액세스 토큰 및 리프레시 토큰으로 교환합니다.
- 발급받은 토큰 정보를
token.json파일로 저장하여, 다음번부터는 로그인 절차를 생략할 수 있도록 합니다.
export async function authorize(): Promise<OAuth2Client> {
  let client = await loadSavedCredentialsIfExist();
  if (client) {
    return client;
  }
  client = await authenticate({
    scopes: SCOPES,
    tokenPath: TOKEN_PATH,
  });
  if (client) {
    await saveCredentials(client);
    return client;
  }
  throw new Error("Authentication failed.");
}

export async function loadSavedCredentialsIfExist(): Promise<OAuth2Client | null> {
  try {
    const content: string = fs.readFileSync(TOKEN_PATH, "utf-8");
    const credentials = JSON.parse(content) as Token;
    return google.auth.fromJSON(credentials) as OAuth2Client;
  } catch {
    return null;
  }
}

async function saveCredentials(client: OAuth2Client): Promise<void> {
  const content: string = fs.readFileSync(CLIENT_SECERT_PATH, "utf-8");
  const keys = JSON.parse(content) as ClientSecret;
  const key = keys.installed || keys.web;
  if (!key) {
    throw new Error("No client secrets found in client_secret.json");
  }
  const payload: string = JSON.stringify({
    type: "authorized_user",
    client_id: key.client_id,
    client_secret: key.client_secret,
    refresh_token: client.credentials.refresh_token,
  });
  fs.writeFileSync(TOKEN_PATH, payload);
}

function authenticate(options: { scopes: string[]; tokenPath: string }): Promise<OAuth2Client> {
  return new Promise((resolve, reject) => {
    const content: string = fs.readFileSync(CLIENT_SECERT_PATH, "utf-8");
    const keys = JSON.parse(content) as ClientSecret;
    const key = keys.installed || keys.web;
    if (!key) {
      return reject(new Error("No client secrets found in client_secret.json"));
    }

    const oAuth2Client = new google.auth.OAuth2(
      key.client_id,
      key.client_secret,
      `http://localhost:3000/oauth2callback`
    );

    const authorizeUrl: string = oAuth2Client.generateAuthUrl({
      access_type: "offline",
      scope: options.scopes.join(" "),
    });

    const httpServer = http
      .createServer(async (req, res) => {
        try {
          if (req.url && req.url.includes("/oauth2callback")) {
            const qs = new url.URL(req.url, "http://localhost:3000").searchParams;
            res.end("Authentication successful! Please return to the console.");
            httpServer.close();
            const code = qs.get("code");
            if (code) {
              const { tokens } = await oAuth2Client.getToken(code);
              oAuth2Client.setCredentials(tokens);
              resolve(oAuth2Client);
            } else {
              reject(new Error("No code found in callback URL"));
            }
          }
        } catch (e) {
          reject(e);
        }
      })
      .listen(3000, () => {
        open(authorizeUrl, { wait: false }).then(cp => cp.unref());
      });
  });
}
인증 프로세스를 위한 ‘트리거’ 만들기
이제 이 복잡한 인증 과정을 단 한 줄의 명령어로 실행할 수 있도록 ‘트리거’를 만들어 보겠습니다. src/index.ts 파일을 열고, main() 함수 아래 코드를 다음과 같이 수정해주세요. 커맨드 라인 인자로 auth가 들어오면, 우리가 만든 authorize() 함수를 실행하도록 하는 로직입니다.
// src/index.ts

// ... main() 함수는 그대로 둡니다 ...

if (process.argv.includes("auth")) {
  authorize().then(() => {
    console.log("Authentication successful! 🎉");
    process.exit(0);
  });
} else {
  main().catch(error => {
    console.error(`Fatal error in main(): ${error}`);
    process.exit(1);
  });
}
이제 package.json 파일에 npm run auth 명령어를 추가해서 간편하게 실행할 수 있도록 스크립트를 등록합시다.
{
  "scripts": {
    "auth": "npm run build && node build/index.js auth",
    ...
  },
  ...
}
두근거리는 순간: 직접 인증 실행하기
자, 모든 준비가 끝났습니다. 떨리는 마음으로 인증을 시작해볼까요? 터미널에 아래 명령어를 입력하세요.
$ npm run auth
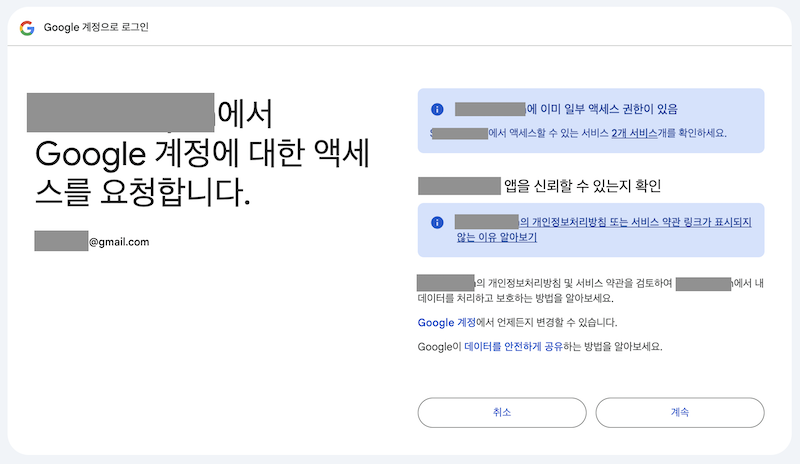
명령어를 실행하면 잠시 후 웹 브라우저가 자동으로 열리면서 익숙한 구글 로그인 및 계정 액세스 요청 화면이 나타날 겁니다. 계속 버튼을 눌러 권한을 허용해주세요.
인증에 성공했다는 메시지가 브라우저에 나타나면, 터미널로 돌아와 보세요. “Authentication successful!” 메시지가 당신을 반겨줄 겁니다.
축하합니다! 이제 여러분의 credentials 폴더에는 token.json이라는 소중한 파일이 생성되었을 거예요. 이 파일 안에는 AdMob API와 자유롭게 통신할 수 있는 만능 키, 리프레시 토큰이 저장되어 있습니다.
{
  "type": "authorized_user",
  "client_id": "xxxxxxx.apps.googleusercontent.com",
  "client_secret": "xxxxxxxxxxxxx",
  "refresh_token": "xxxxxxxxxxxxx"
}
마무리하며
고생 많으셨습니다! 이번 포스트에서는 다소 복잡하게 느껴질 수 있는 OAuth 인증 과정을 차근차근 함께 정복해봤습니다. 이제 우리 MCP 서버는 AdMob API와 대화할 수 있는 ‘만능 열쇠’를 손에 쥔 셈이죠.
다음 마지막 파트에서는 이 열쇠를 사용해서 실제로 MCP 서버가 AdMob API를 호출하고, 유의미한 데이터를 가져오는 방법을 알아보겠습니다. 기대해주세요!